Saturday, November 27, 2010

Playing with Shadows

I decided to take on an easier challenge, in comparison to my dandelion :) This project involved cutting paper in the form of a flower. Each square is 6"x6".

The end products!
The pieces of cut out paper, glued onto a paper backing
The challenging part, cutting it while keeping it in one piece
I wanted to highlight the stencil quality of the cut out so I decided to elevate the stencil from the paper.
The elevated cut-out added a whole new dimension of shadows that I really like.
 Playing with Shadows!

Saturday, November 20, 2010

Dandelion making

Overall this what the making process looked like.

1) Brainstorm idea, buy materials, and make test samples to make sure the idea works

2) Paint skewers, cut paper, roll and attach paper to end of skewers. Lots of them...150ish? Listen to jazz as you work :)


3) Add foam clay to the bottom of the skewers


4) Paint foam ball

5) Begin inserting skewers into foam
 

6) Make the flying tufts with the fishing wire and hanger. Insert into the foam and hope it works!


7) Cover lamp pole with green poster board

8) Cut, color, and curl green poster board for the part right under the foam
 

9) Cut a ring into bottom of foam and insert on top of lamp pole

And the dandelion is complete!!


Thursday, November 18, 2010

Dandelion in the Day

 Here are some pictures I took today.

Biggest dandelion I've ever blown :) Maybe that means I get more than one wish?
Details- Skewers painted white, with brown clay and snipped and rolled white paper. Foam core painted green.

Frilly green paper- cut, colored for the browned dying edges, and curled


I was originally going to make a dandelion that would hang from the ceiling, mainly because I wanted to make the lone tufts look like they were flying away in the wind. Because I don't have a ceiling that I wanted to permanently put nails into and hang dandelions from, I was going to make a makeshift ceiling from cardboard, attach it to the garage ceiling and then hang my art work from that. In the end, I decided it wasn't going to be worth the trouble of figuring out the details of how I was actually going to execute my plan considering I would probably have to take it down after taking some photos. So...I did some problem solving and decided to make it a standing dandelion, using an old lamp stand we had just sitting in the garage. To make the tufts look like they were flying, I cut a wire clothing hanger as shown in the diagram to the right. All the tufts were attached by fishing wire to the hanger and the fishing line. It's not ideal, since you can see the wire of the hanger, but the ones hanging from the fishing wire turned out nicely, especially because it's free to dangle around and seems more free flowing. If I had a permanent place to put it, it would probably be a good idea to paint the color of the wire the same as the background wall, at least to camouflage it a little better.

I will be posting pictures more pictures of how I made it within the next few days.

Tuesday, November 16, 2010

Dandelion in the Night

With my heart set on finishing my dandelion today, I am finally done and here are some pictures of the finished project. It is 6' 2" tall and the diameter is about 20 inches. I'll take a picture of myself with dandelion for scale sake tomorrow. :)

As photographers and artists know, lights change the way we perceive color and can totally change the composition of the picture. Tonight I will post night pictures, some where I play with the shadows the come from the lighting. Tomorrow, I will post some daylight photos that will hopefully do a better job capturing the actual dandelion.

Well...without much ado, here it is!


More photos coming soon! :)

Sunday, November 7, 2010

Suspense

For those of you who are wondering, I haven't given up my goal yet! :) I've realized my dandelion project was a bit ambitious and it is taking me longer than I expected...and my original plan is requiring some adjusting, so I've needed to do some problem solving. So, my one week project has become a 2+ (hopefully no more than 3-week) project. But for proof that I am working on it, here are some pictures. These are the dandelion tufts made of skewers ("stem"), paper (the frilly top part), and foam clay (the bottom seed part). I've managed to make 100 so far, but am needing to make much more. As tedious and time consuming as this project has been, I've had some wonderful moments snipping paper underneath my the yellow light of my desk lamp and listening to jazz as I let my thoughts wander. :)

Painting the first batch of skewers


The evolution of a dandelion tuft

A completed tuft waiting to become part of the whole...
The beginnings of batch 3. Skewer number 101? Waiting to be clayed.

TO BE CONTINUED...

Wednesday, October 27, 2010

Acrylic Recap


Learning is a process and I definitely learned some new things last week.

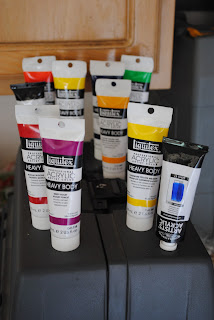
1. Remember to check the opaqueness/transparency of paint! Some paints are solid, without any amount of transparency. Others are transparent, having more of a stained glass effect when it dries. Others are halfway between opaque and transparent-translucent. There is a dark purple color that I dribbled on top of the blue base...which I had originally planned to be a bright magenta-ish purple. But when it dried it darkened because it was translucent and the blue underneath darkened the color. Also, the extra water I added to make the paint more fluid, thinned out the color. I still wanted some bright colors to capture the spontaneity and excitement of splashing in puddles, so I added the orange and yellow.

2. Acrylic paint darkens when it dries. I had lots of surprises with colors this week! Haha..never quite knew what to expect.

3. How fluid mediums work. You can't just add water to acrylic paint to thin it, because it affects the amount of pigment in the paint. So, in order to thin or thicken paint, you can buy different types of mediums to adjust it accordingly...and it doesn't change the quality or the pigment of the paint. You can do so much with the medium, and I've only just scratched the surface. I'm excited to try different things!

4. I love texture!
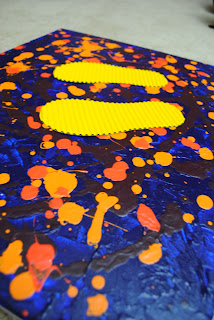
See the white triangular tool on the very right? That is a palette knife. You can use it to scoop up paint and put it onto your pallet. But you can also use it like a paintbrush and smear on the paint onto the canvas with the pallet knife. That's what I did for the dark blue base. You can't really tell in the photo of the piece, but it adds a certain texture and variety that cannot be achieved with a brush. I absolutely loved using it!

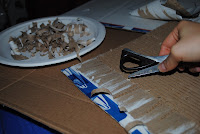
I decided to use cardboard for the footprints to make it seem like the bottom ridges of rain boots. It was kind of therapeutic scraping off the layer, row by row. Some brainless activity-not having to think about what colors to use, how to mix the paint to get the right color, etc.


Anyway, it was a learning experience and I am excited to have started this project! I've come up with an idea for this next week's project and went shopping for the materials today. Subject is dandelions! :)

Sunday, October 24, 2010

Project 1- Puddle Splashin'


 Size: 16 x 20,  Materials: Canvas, acrylic paint, cardboard


Having started this goal half way through the week, I only had a few days to start and finish my first project. I decided to use acrylic paint for this week. I like to play around with colors, forms, and textures and to capture certain feelings using those three things.  I looked up some pictures online under "puddle splashing" and I came across some pictures that helped me to capture a certain feeling about splashing in puddles. Then I brainstormed some ideas about how I would express those feelings and this is the end result :)


Thursday, October 21, 2010

Vision

This blog is for my art adventures- "splashing in puddles" and getting messy!

I have always loved arts and crafts and I have finally recently been able to pursue this interest actively. I've taken a few drawing classes and am now taking a ceramics and painting class. I hope to one day become an art therapist so I can be a part of seeing people grow and finding hope, freedom, and joy.

To increase my interest in art and my experience with a variety of mediums, I am making a goal to make at least one project per week starting this week until the end of December. Part of this journey is going to be about exploring what art is. Is it the skill that is put into it, or can anyone do it as long as they express themself though it? If it is about expression, I want to learn how to express who I am. How colors, shapes, forms, figures, objects work with our heart and soul. I also hope to discover who I am as I look at the things I make. I want to learn to manipulate colors, shapes, forms, figures, medium, etc to communicate something to viewers. I also look forward to finding that others will respond differently to the same work of art and will see things that I didn't see.

I hope that this blog will motivate me to do what I want to do!